This is for the Fix My Pic Please group at flickr.com
Examples | Lasso Tool • flickr.com
____________________________
For more Lesson 2 examples:
Examples | Lesson2 • flickr.com
...and specifically for Lesson 2A:
Examples | Lesson2A • flickr.com
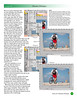
Lesson 2A: the Lasso Tool:
__________________________________________
...and Lesson 2D:
Examples | Lesson2D • flickr.com
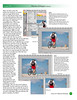
Lesson 2D: Lasso Tool Techniques...

Here is a link to the adorable original by cathygray:

www.flickr.com/photos/97413291@N00/355066980/in/pool-fixm...
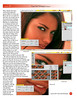
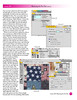
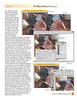
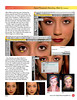
I thought this photo was so wonderful!! I touched up the skin as kathygray had requested and got rid of the watery eye, lips and chin. I brightened and contrasted the entire subject, except his shirt. I then darkened just the background. I used only the lasso tool with varying feather amounts. I think it is the best tool for portrait work becase it allows you to use such a soft edge. Thank you cathygray for letting me work on your awesome photo!!
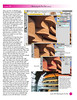
And thank you for your interest cathygray. On this fix I actually did no blurring at all. What I did was select a portion that was close to the portion to be fixed. for instance, on Sam's forhead there were some red sploches, so I would select a portion of skin close to that area with the lasso. Just a quick circle or oval. For small selections I had the feather set at 4-6. I would copy this to a new layer and slide it into position. The lighting changes very subtley through the face, so this copied portion usually needs to be adjusted with the brightness control. Once i got the lighting where I liked it I would move on to the next portion. I usually work on the image quite large, and I always make sure the fix is completely undetectable. I also check it at a small size where the image fits fully on the screen.
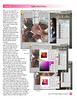
When I am doing several portions like this I just keep adding layer and layer with the fixed portions. I keep the original photo as the background layer (which I keep turnd off) and work of a copy of the original, so when I get several layers that I am happy with I select "merge visible" from the layers pull down menu. This combines all of the visible layers onto one. There is no goin back now, so I make sure the edits are completely unnoticed.
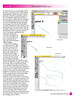
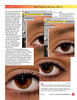
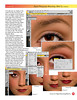
For the eyes I used a feather of 2 pixels and copied small portions from the left eye that I flipped, and brightened for the right eye. I used the eraser airbrush to help soften the edges of the selections where needed. Once the watery reflections were gone I selected the just the whites of both eyes using a feather of 1 pixel. I created a new layer that I added a fill of white to. I use increments of 5% until I get it to where I like it, this one was 15%. Sometimes it may end up looking too flat so I can simply adjust the opacity of this layer and fine tune it to where it looks best.
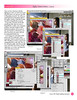
For the iris' I also used a feather of 1 pixel and then first sharpened then contrasted this selection. For the lip I selected the right side and included a good portion below, almost to the chin. I copied this and flipped it horizontally. Because it is slightly closer to us I scaled it up just a bit. I used a feather of 33 for this selection so it would blend quite smoothly. Once I got the size correct I used the airbrush eraser to blend it even more. I like to use a large brush for this, 100 pixels, with a very soft pressure, 8-10%. This allows you to sort of tease the edge and make it very subtle.
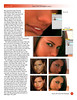
For under the nose I did the same by selecting different portions of one side and flipping it for the other. If your selection is smal, so too should be the feather. Keep it as soft as you can. If the portion you have selected is not quite opaque enough, simply duplicate that layer once or twice and it should help cover what is below.
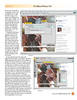
I had a total of about 175-200 layers, but merged them as I went so I was only working with about 20 at a time. With more mature skin I usually select a mask so to speak of the final touched up face to a new layer and blur slightly, but this little guy has perfectly soft skin already. He is just way too cute. Makes me smile everytime I see him. I like that.


![reflectionBC [circa 2004]](https://live.staticflickr.com/43/99634407_686392fef7_m.jpg)
![GrfxDziner group [11-30-2014, Thanksgiving weekend]](https://c2.staticflickr.com/8/7485/15915281425_dfac59fa28_m.jpg)